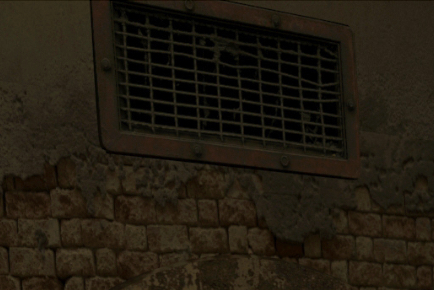
Apartment
Step 1
Get the plant spray.
Step 2
Use the plant spray on the flower on the piano.
Step 3
Use the plant spray on the flower near the phone.
Step 4
Use the plant spray on the flower on the table.
Step 5
Use the plant spray on the flower to the left of the TV.
Step 6
Use the plant spray on the flower to the right of the TV.
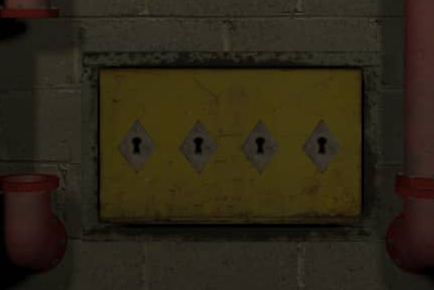
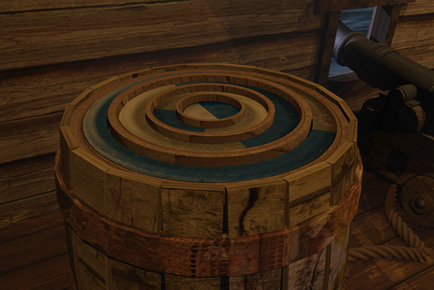
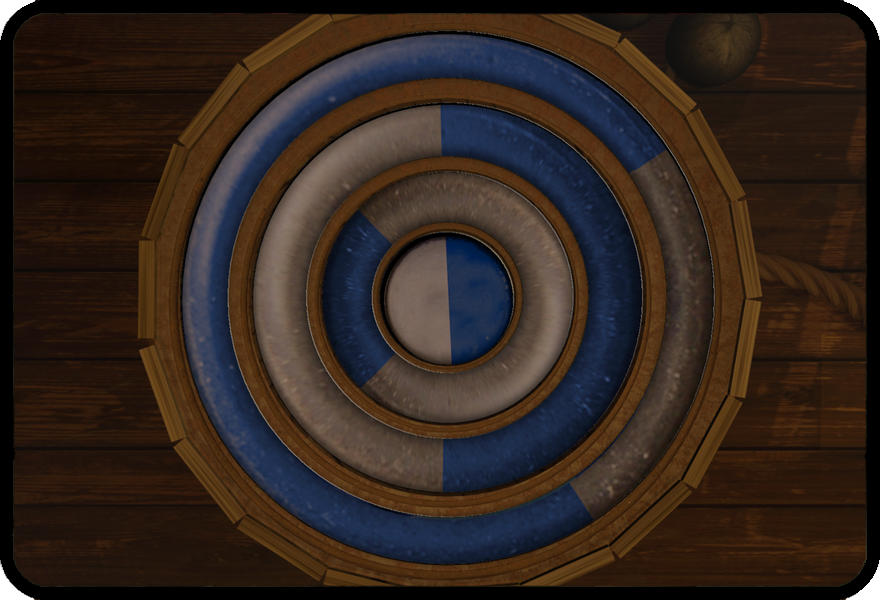
Step 7
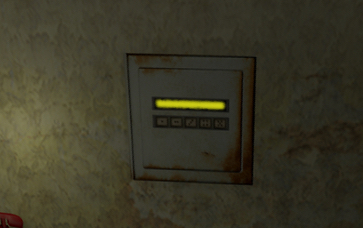
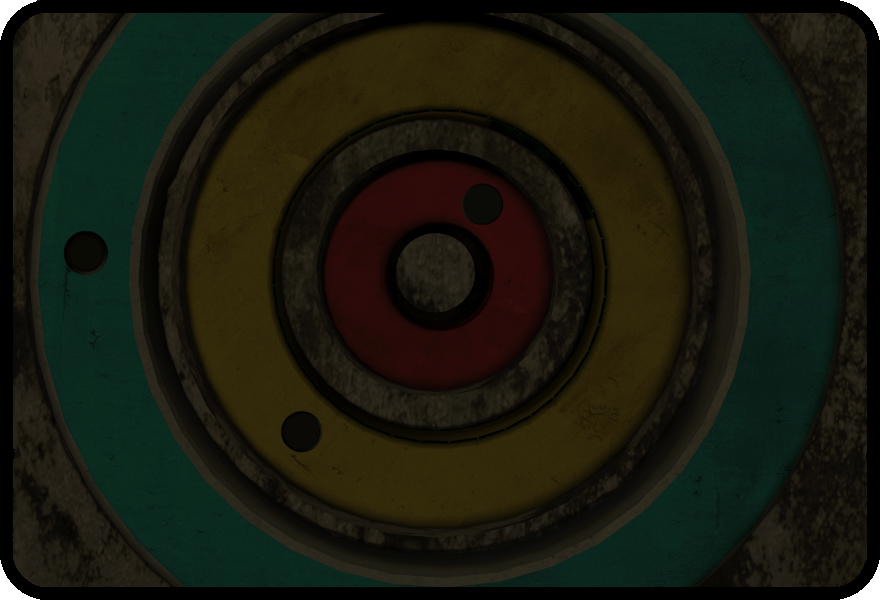
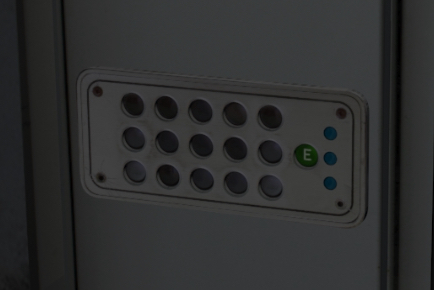
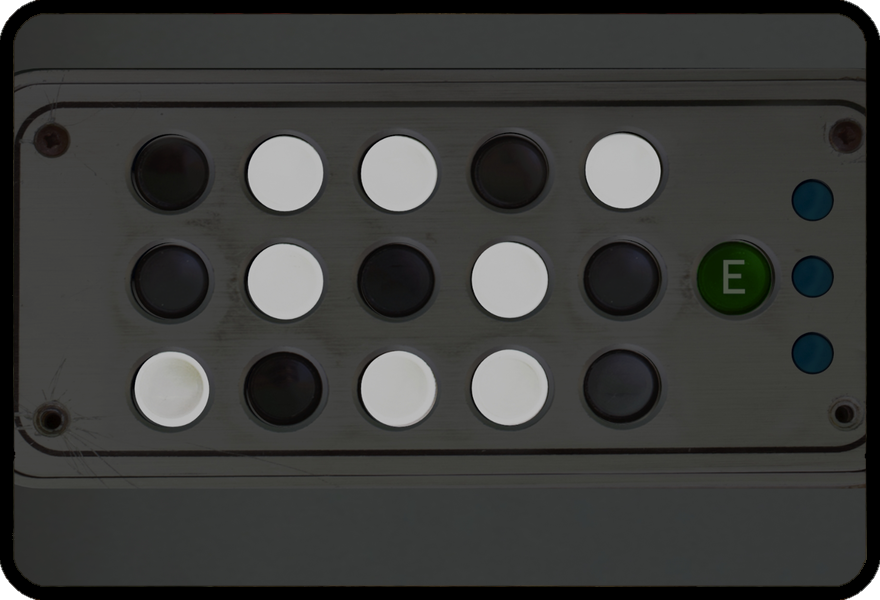
Use the colours of the flowers and the numbers on their pots to unlock the safe.
Show Me The Solution
Press 4, 5, 3, 1, 2.

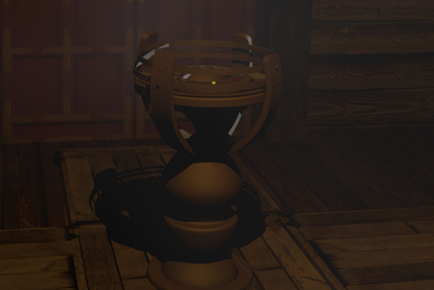
Step 1
Take a photo of the phone number in the magazine on the table.
Step 2
Dial the number using the phone by the door.
Show Me The Solution
Dial 555 989 426
Step 3
Collect the plant spray from the delivery.
Step 1
Take a photo of the note on the coffee table.
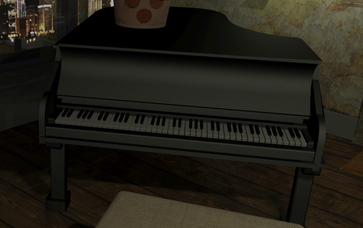
Step 2
Take a photo of the piano picture near the bookcase.
Step 3
Play the keys F E E D on the piano.
Show Me The Solution
Press the 8th key once, followed by the 7th key twice, then the 6th key once.
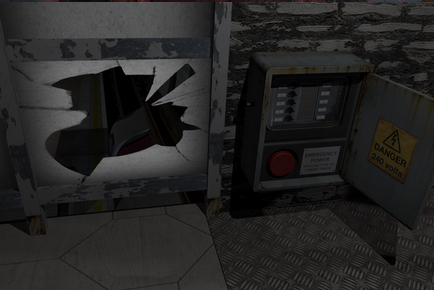
Step 4
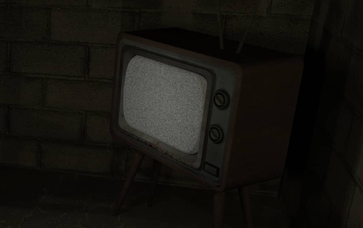
Collect the remote control for the TV.
Step 1
Use the colours of the flowers and the numbers on their pots to unlock the safe.
Show Me The Solution
Press 4, 5, 3, 1, 2.
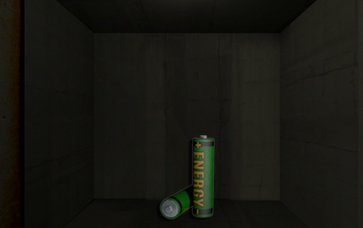
Step 2
Collect the batteries for the remote control.

Step 1
Collect the remote control for the TV.
Show Me Where
It’s in the piano.
Step 2
Collect the batteries for the remote control.
Show Me Where
It’s in the wall safe.
Step 3
Combine the remote with the batteries.
Show Me How
Drag the batteries over the remote in the inventory.
Step 4
Use the remote with the TV.
It’s Not Working?
Did you forget the batteries?
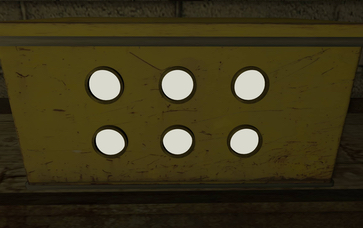
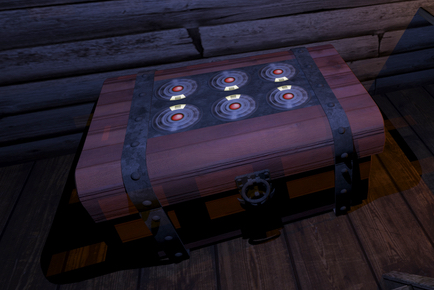
Step 5
Use the clues displayed on the TV for channels 1 to 4 to unlock the bookcase.
Show Me The Solution
Press the 3rd and 6th books in, followed by the 1st and 6th, 5th and 9th and then 4th and 7th.
Step 6
Collect the telescope.
Step 1
Use the clues displayed on the TV for channels 1 to 4 to unlock the bookcase.
Show Me The Solution
Press the 3rd and 6th books in, followed by the 1st and 6th, 5th and 9th and then 4th and 7th.
Step 2
Collect the telescope.
Step 3
Place the telescope on the tripod.
Step 4
Take a photo of the door code through the telescope.
Step 5
Enter the code from your flat into the keypad and hit the ‘Ent’ button.
Show Me The Solution
The code is 87921.
Apartment
Step 1
Get the plant spray.
Step 2
Use the plant spray on the flower on the piano.
Step 3
Use the plant spray on the flower near the phone.
Step 4
Use the plant spray on the flower on the table.
Step 5
Use the plant spray on the flower to the left of the TV.
Step 6
Use the plant spray on the flower to the right of the TV.
Step 7
Use the colours of the flowers and the numbers on their pots to unlock the safe.
Show Me The Solution
Press 4, 5, 3, 1, 2.
Step 1
Take a photo of the phone number in the magazine on the table.
Step 2
Dial the number using the phone by the door.
Show Me The Solution
Dial 555 989 426
Step 3
Collect the plant spray from the delivery.
Step 1
Take a photo of the note on the coffee table.
Step 2
Take a photo of the piano picture near the bookcase.
Step 3
Play the keys F E E D on the piano.
Show Me The Solution
Press the 8th key once, followed by the 7th key twice, then the 6th key once.
Step 4
Collect the remote control for the TV.
Step 1
Use the colours of the flowers and the numbers on their pots to unlock the safe.
Show Me The Solution
Press 4, 5, 3, 1, 2.
Step 2
Collect the batteries for the remote control.
Step 1
Collect the remote control for the TV.
Show Me Where
It’s in the piano.
Step 2
Collect the batteries for the remote control.
Show Me Where
It’s in the wall safe.
Step 3
Combine the remote with the batteries.
Show Me How
Drag the batteries over the remote in the inventory.
Step 4
Use the remote with the TV.
It’s Not Working?
Did you forget the batteries?
Step 5
Use the clues displayed on the TV for channels 1 to 4 to unlock the bookcase.
Show Me The Solution
Press the 3rd and 6th books in, followed by the 1st and 6th, 5th and 9th and then 4th and 7th.
Step 6
Collect the telescope.
Step 1
Use the clues displayed on the TV for channels 1 to 4 to unlock the bookcase.
Show Me The Solution
Press the 3rd and 6th books in, followed by the 1st and 6th, 5th and 9th and then 4th and 7th.
Step 2
Collect the telescope.
Step 3
Place the telescope on the tripod.
Step 4
Take a photo of the door code through the telescope.
Step 5
Enter the code from your flat into the keypad and hit the ‘Ent’ button.
Show Me The Solution
The code is 87921.
Lift

Step 1
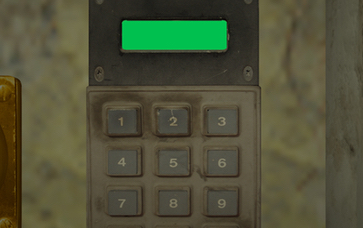
Take a photo of the braille under the keypad on floor 2.
Step 2
Take a photo of the lift buttons.
Step 3
Use the braille on the lift buttons to translate the braille code under the keypad to work out the required code and enter it.
Show Me The Solution
The code is 2556.

Step 1
Take a photo of the squares on the wall of floor 1.
Step 2
Press the sliders on the box on floor 4 so that they match the clue from floor 1.
Show Me The Solution
Top row: ‘right’, ‘left’, ‘left’, ‘right’, ‘left’.
Middle row: ‘right’, ‘right’, ‘left’, ‘right’, ‘right’.
Bottom row: ‘right’, ‘right’, ‘left’, ‘left’, ‘left’.

Step 1
Collect the hammer.
Show Me Where
It’s on the shelf on floor 6.
Step 2
Use the hammer to break the wall on the 4th floor.
Step 3
Collect the eyepiece from the yellow box.
Step 4
Use the eyepiece on the clue of wall 3 and then collect the items in the Arcade game in the order shown.
Show Me The Solution
The order is ‘triangle’, ‘rectangle’, ‘ruby’, ‘diamond’, ‘ruby’, ‘diamond’, ‘octagon’, ‘rectangle’.

Step 1
Collect the empty water bottle.
Show Me Where
It’s on floor 1.
Step 2
Fill the water bottle from the dripping pipe in the basement.
Step 3
Place the filled water bottle on the button on floor 8 to hold it down.
Step 4
Collect the key from the lamp on floor 5.

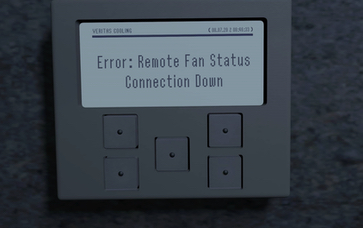
Step 1
Fix the info screen near the lift doors.
Step 2
Close the advert on the info screen, go to ‘Help’ and ‘Reset Lift’, then enter the code into the lift buttons.
Show Me The Solution
The sequence is ‘Hold Lift’, 1, 4, 2, 3, 8, ‘Close Doors’, -1, 6, 5, 7, ‘Hold Lift’.
Step 3
Unlock the box in the basement.
Step 4
Collect the ground floor button.
Step 5
Place the ground floor button into its’ slot and then escape through the ground floor.

Step 1
Collect the screwdriver.
Show Me Where
It’s in the box on floor 4.
Step 2
Use the screwdriver on the panel on the left of the lift doors to remove it.
Step 3
Collect the tape.
Show Me Where
It’s on the shelf on floor 6.
Step 4
Use the tape on the loose wires to fix the info screen.
Step 1
Collect the key from the lamp on floor 5.
Step 2
Collect the key from the Arcade machine’s prize slot.
Step 3
Collect the key from the keypad on floor 2.
Step 4
Collect the key from the lift buttons.
Step 5
Insert all 4 keys to unlock the box in the basement.
Basement

Step 1
Collect the screwdriver.
Show Me Where
It’s in second drawer of the filing cabinet.
Step 2
Use the screwdriver to open the tin of paint near the table.
Step 3
Collect the red pool ball from the paint tin near the table.
Step 4
Collect the yellow pool ball from near the washing machine.
Step 5
Collect the red pool ball from the pool table.
Step 6
Collect the yellow pool ball from the pool table.
Step 7
Collect the white pool ball from the holder in the pillar.
Step 8
Use the screwdriver to remove the lid of the middle paint tin near the washing machine.
Step 9
Dip the white ball in the red paint so you have an extra red ball.
Step 10
Place the balls onto the holders in the order depicted by the treadmill.
Show Me The Solution
The order is red, yellow, red, yellow, red.

Step 1
Collect the spare fuse.
Show Me Where
It’s in the yellow lockbox.
Step 2
Insert the spare fuse into the plug.
Step 3
Plug in the fixed treadmill to turn it on.

Step 1
Pickup the dirty t-shirt from the rail.
Step 2
Collect the washing powder from the shelf.
Step 3
Place the t-shirt in the washing machine.
Step 4
Place the washing powder in the washing machine.
Step 5
Wash the t-shirt in the machine to get some shapes.
Step 6
Use the shapes on the washed t-shirt to open the filing cabinet lock.
Show Me The Solution
The sequence is ‘circle’, ‘square’, ‘triangle’, ‘rhombus’, ‘hexagon’.
Step 1
Collect the roll of tape.
Show Me Where
It’s by the door at the top of the stairs.
Step 2
Place some tape on the tv’s brightness knob to hold it in place.

Step 1
Fix the tv’s brightness knob so you can see the pillar better.
Step 3
Take a photo of the drawing on the pillar.
Step 4
Adjust the discs on the table so that the red lines match the markings on the pillar.
Show Me The Solution
Step 1
Take a photo of the fish poster above the pool table.
Step 2
Press the box buttons in the order depicted by the fish poster to unlock it.
Show Me The Solution
With the top buttons numbered 1-3 and the lower buttons numbered 4-6, the order is 3, 2, 4, 1, 5, 6.

Step 1
Collect the key from the puzzle box on the table.
Step 2
Collect the key from the ball puzzle in the pillar.
Step 3
Collect the key from the filing cabinet.
Step 4
Insert all 3 keys into the door and unlock it.
Jail
Step 1
Take a photo of the candles on the cake.
Step 2
Use the heights of the candles to position the sliders on the metal box.
Show Me The Solution
From left to right position the sliders in the 1st, 3rd, 4th, 2nd, and 1st positions.

Step 1
Collect the towel from the rail by the toilet.
Step 2
Collect the ice from the window, using the pick hammer.
Step 3
Pickup the bucket near the door.
Step 4
Take the plug from the sink.
Step 5
Fix the bucket by putting the plug in the hole, then put the ice in it.
Show Me How
Drag the plug item over the bucket in the inventory, then do the same with the ice.
Step 6
Place the ice bucket on the hot pipes by the toilet.
Step 7
Soak the towel by placing it in the bucket of water.
Step 8
Use the wet towel to clean the mirror.
Step 1
Clean the mirror by the bed.
Step 2
Use the clue on the mirror to slide the latches on the manhole cover.
Show Me The Solution
With the latch at the top as 1, going clockwise, press the 4th, 6th, 8th, 1st, 3rd, 2nd, 7th, and 5th.
Step 1
Take a photo of the clue on the top bunk.
Step 2
Use the photo of the bed to press the correct tiles in.
It’s Not Working?
Make sure you rotate the photo so that the corner shapes match.

Step 1
Collect the knife from behind the wall panel near the door.
Step 2
Cut the cake on the table with the knife.
Step 3
View the note inside the cake.
Step 4
Break the wall with the writing on it using the pick hammer.
Step 5
Collect the key from behind the plaster.
Step 1
Collect the key from behind the loose plaster
Step 2
Collect the key from under the manhole cover.
Step 3
Collect the key from inside the large box by the wall.
Step 4
Use all three keys to unlock the box.

Step 1
Collect the cell key from inside the yellow box on the shelf.
Step 2
Use the cell key to unlock the door and gain your freedom.
Temple

Step 1
Press the required buttons to spin the discs to the correct rotations.
Step 2
Enter the numbers into the box dials.
Show Me The Solution
The code is 1 8 9 8 6 9 1 9.

Step 1
Take a photo of the markings on the floor where you first entered.
Step 2
Use these markings to press the buttons in the correct order.
Show Me The Solution
The sequence is 1, 1, 1, 3, 3, 2, 3, 3, 3.

Step 1
Collect the empty pot.
Show Me Where
It’s in the wall panel to the left of the main room.
Step 2
Fill the pot with the liquid in the font near where you started.
Step 3
Pour the water into the receptacle in the left hand corner of the main room.

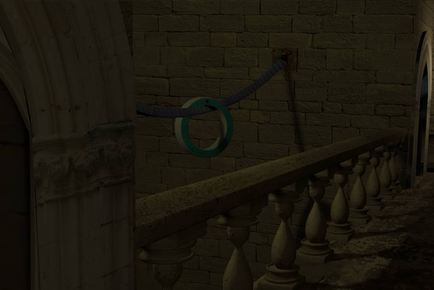
Step 1
Collect the crowbar.
Show Me Where
It’s on the floor of the room to the left where you started.
Step 2
Use the crowbar to remove the planks.
Step 1
Take a photo of the pyramid in the main room from the balcony where the rope is.
Step 1
Using the markings on the floor around the pyramid, switch on the required panels on each of its’ sides.
Show Me The Solution
With the panels numbered 1-6 top-to-bottom & left-to-right the order is:
N – 2 3. S – 2 6.
E – 1 5. W – 1 4 6.

Step 1
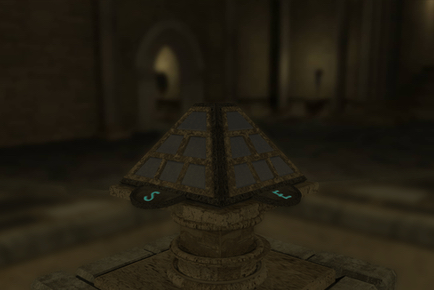
Take a photo of the roman number chart to the right of the main room.
Step 2
Work out the pattern then enter all 5 clues by selecting their row via the right hand sliders and then press the required buttons.
Show Me The Solution
The blocks move right by 1 each time, with block counts alternating between the rows, so the 5th pattern is a single block in the 3rd column.
Step 1
Collect the knife.
Show Me Where
It’s in the locked box in the room to the left where you started.
Step 2
Use the knife to cut the ivy.
Step 1
Collect the planks.
Show Me Where
They’re on the floor in the main room from when you pulled them down.
Step 2
Place the planks down to fix the bridge.

Step 1
Take a photo of the hieroglyphics on the stone lab at the top of the steps.
Step 2
Pay attention to the patterns on the hatch and the positions of the glyphs on the stone slab. Then select the required glyphs.
Show Me The Solution
The order is ‘pot stand’, ‘box’, ‘bird’, ‘two reed leaves’, ‘pot stand’.

Step 1
Take a photo of the arrows near the lock box in the left hand room near where you started.
Step 2
Use the arrows to press the required directional buttons on the lock near the door.
Show Me The Solution
The order is right, left, up, up, right, down, down, right.

Step 1
Collect the heavy stone from where you started.
Step 2
Collect the heavy stone near the font.
Step 3
Collect the heavy stone the other side of the broken bridge.
Step 4
Collect the heavy stone in the wall panel to the left of the main room.
Step 5
Pour a liquid into the tiles on the floor in the main room.
Step 6
Place all the heavy stones on the pillars and arrange them so the pillar heights match the liquid in the tiles.
Show Me The Solution

Step 1
Collect the unlit torch from the glyph hatch near the right hand steps.
Step 2
Light the torch on a nearby flame. Be careful though, fire is known to be hot!
Step 3
Use the lit torch to burn the rope.

Step 1
Collect the stone disc from the rope.
Step 2
Collect the stone disc from the pyramid in the centre of the main room.
Step 3
Collect the stone disc from the hatch behind the 5 pillars.
Step 4
Place all 3 stone discs into the main room’s door.
Step 5
Light the torch behind the door at the far end of the balcony, after the bridge.
Step 6
Close the door and then go all the way around to the other side and take a photo of the closed door.
Step 7
Use the image on the back of the door to line up the 3 discs and unlock the door.
Show Me The Solution
Forever Lost

Step 1
Take a photo on the wall near the dirty mirror.
Step 2
Use that clue to put the correct 5 letter word into the letter box and collect the item inside.
Show Me The Solution
The correct word is ‘LIGHT’.

Step 1
Use the UV torch in the toilet and take a photo close up of the resulting clue.
Step 2
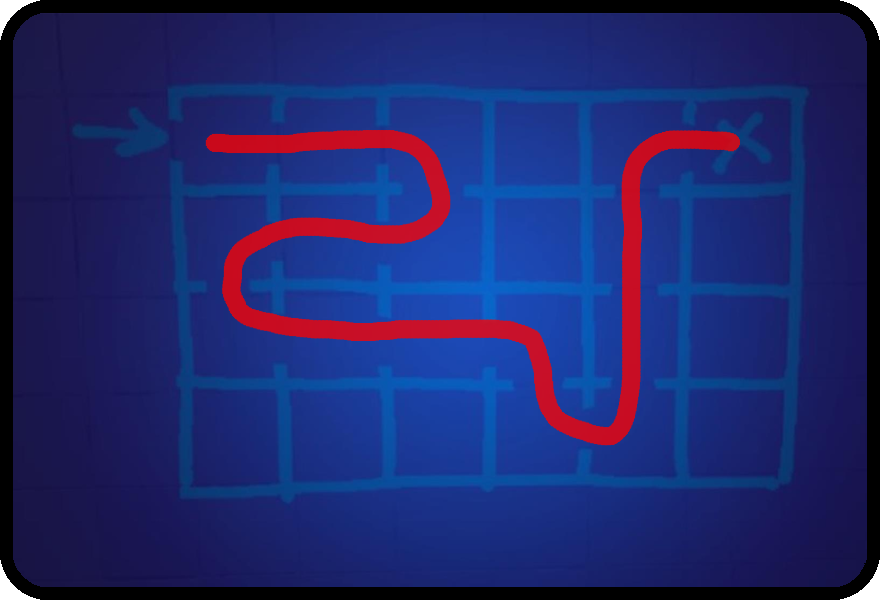
Use the clue from the toilet wall to trace a path through the tiles.
Show Me The Solution
Step 1
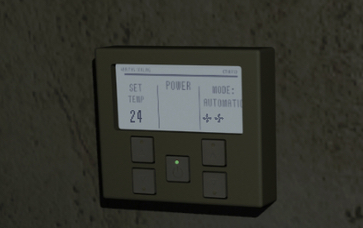
Set the desk fan’s position so that the temperature readout on the air-con controls is 23.
Step 2
Collect the paper fan.
Show Me Where
It’s in the tile box near the toilet door.
Step 3
Use the paper fan on the air-con controls to lower the temperature to 22.

Step 1
Collect the cleaning spray.
Show Me Where
It’s in the toilet.
Step 2
Collect the barcode scanner.
Show Me Where
It’s in the wooden tile box.
Step 3
Use the cleaning spray to clean the dirty mirror.
Step 4
Use the UV torch on the now clean mirror and then use the writing as a guide for which things to scan.
Show Me The Solution
The required item order is the back of the dog book, the gift receipt, the head statue, and the back of the book again.
Step 5
Use the readout from the barcode scanner to unlock the keypad.
Show Me The Solution
The correct code is A5B4E2C1D3.

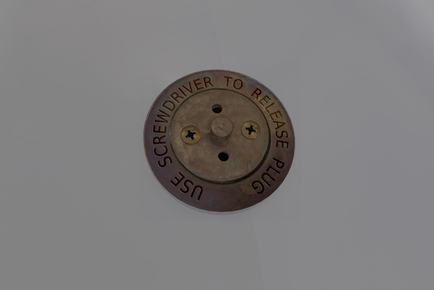
Step 1
Collect the 1st metal weight.
Show Me Where
It’s behind the air con blades.
Step 2
Collect the 2nd metal weight.
Show Me Where
It’s in the toilet, you might need to do some plumbing first.
Step 3
Collect the 3rd metal weight.
Show Me Where
Use the UV torch in the main room and see what you notice.
Step 4
Collect the 4th metal weight.
Show Me Where
It’s in the locked box by the dirty mirror.
Step 5
Collect the 5th metal weight.
Show Me Where
It’s on the toilet sink.
Step 6
Collect the 6th metal weight.
Show Me Where
It’s in the gift box.
Step 7
Collect the 7th metal weight.
Show Me Where
It’s in the wooden tile box.
Step 8
Collect the 8th metal weight.
Show Me Where
It’s in the locked box by the dirty mirror.
Step 9
Collect the 9th metal weight.
Show Me Where
It’s near the desk fan.
Step 10
Take a photo of the stopped clock.
Step 11
Place weights on the left hand scale platform so they add up to the stopped hour hand.
Show Me The Solution
Use a 0.5kg weight, a 1kg weight, and a 1.5 kg weight.
Step 12
Place weights on the middle scale platform so they add up to the stopped second hand.
Show Me The Solution
Use a 0.5kg weight, a 1 kg weight, and a 4.5kg weight.
Step 13
Place weights on the right hand scale platform so they add up to the stopped minute hand.
Show Me The Solution
Use a 2.5kg weight, a 3 kg weight, and a 5.5kg weight.
A Short Tale
Step 1
Take a photo of the books above the bed.
Step 2
Press the mode buttons on the piano that correspond to the book numbers, taking note of the words they spell, then press the buttons on the till that match the words.
Show Me The Solution
The correct order is Taxi ( cab ), Coffin ( dead ), Robot ( ed ), Taxi ( cab ), Bed ( bed ), Bed ( bed ).

Step 1
Take a photo of the books above the bed.
Step 2
Press the mode buttons in the order specified by the books, then use that info to open the till.
Show Me The Solution
The correct order is 4, 2, 1, 4, 3, 3.

Step 1
Press the ‘Start’ button on the controller and then use trial and error, plus your memory, to decipher the rest of the sequence.
Show Me The Solution
The full sequence is ‘start’, ‘n’, ‘up’, ‘select’, ‘right’, and ‘q’.
Step 1
Take a photo of the poster on the wall.
Step 2
Starting with the bottom left circle, trace a line through the lights that match the line on the poster.
Show Me The Solution
With the lights numbered 1 through 8 starting 12 o’clock and going clockwise the correct pattern is 6, 2, 3, 8, 7, 4, 1, 5

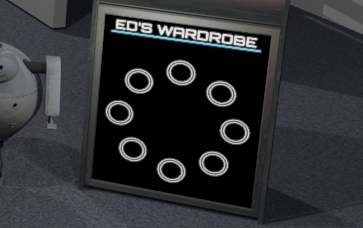
Step 1
Enter the correct sequence of lights to unlock the wardrobe.
Step 2
Take a photo of the shelves to the left of the TV.
Step 3
Place the correct accessories on Ed to unlock a hatch and collect a shape piece.
Show Me The Solution
You will need the baseball hat, VR glasses, a claw on the left, spike on the right, and then going clockwise from the top left the dials should be the stripes, clock, triangles, and coloured balls.

Step 1
Take a photo of the ape t-shirt in the wardrobe.
Step 2
Use the angles of the spears to rotate the bullet dials to the correct angles.
Show Me The Solution
Thinking of them as clocks, the dials should be positioned at the following times – 2, 3, 7, 12, 10, 10, 3, and 9.
Step 1
Collect the rubber darts.
Show Me Where
They’re in the wooden box on the train table.
Step 2
Take a photo of the star markings in the wardrobe.
Step 3
Take a photo of the star light projections under the table.
Step 4
Place the darts in the gun and then treat the projections as the target positions and the marks under in wardrobe as an order, then shoot the targets in this order.
Show Me The Solution
The the targets numbered 1 to 5 from top left in a clockwise fashion the correct order is 3, 2, 5, 1, 4.
Step 1
Collect the circle piece.
Show Me Where
It’s in the hatch near the game console.
Step 2
Collect the square piece.
Show Me Where
It’s in the box near the gun.
Step 3
Collect the bowtie piece.
Show Me Where
It’s in Ed’s wardrobe.
Step 4
Collect the house piece.
Show Me Where
It’s in the till on the desk.
Step 5
Place all shapes in the shape sorter and collect the door key.

Step 1
Collect the door key.
Show Me Where
It’s in the shape sorter by the bed.
Step 2
Use the door key to unlock the door and make your escape.
All That Remains

Step 1
Take a photo of the map in the war room.
Step 2
Use the location of the ‘X’ on the map to align the black bars of the TV so that the correct time is displayed, then take a photo of it.
Show Me The Solution
The displayed time is 6:45.

Step 1
Collect the broom.
Show Me Where
It’s by the fridge in the kitchen.
Step 2
Use the broom to sweep the floor in the storage room, just past the globe.
Step 3
Use the code from the floor of the storage room to unlock the computer.
Show Me The Solution
The code is 786642.
Step 1
Take a photo of the writing on the wall above the tub of plaster.
Step 2
Collect the wrench.
Show Me Where
It’s on the top bunk of the bed in the bedroom.
Step 3
Use the wrench to rotate each of the bolts to the compass points dictated by the writing on the wall.
Step 1
Each button controls a specific fan, use trial and error to work out which button controls which then turn all fans off.
Show Me The Solution
With the fans numbered 1 to 5, back to front, the central button controls the fan #1, and then clockwise from top left the buttons control fans #3, #2, #5, and #4.
Step 1
Collect the first wooden piece.
Show Me Where
It’s in Clara’s room.
Step 2
Collect the second wooden piece.
Show Me Where
It’s in the storage room past the globe.
Step 3
Collect the third wooden piece.
Show Me Where
It’s on the shelves in the room past the fans.
Step 4
Collect the fourth wooden piece.
Show Me Where
It’s on the shelf near the globe.
Step 5
Collect the fifth wooden piece.
Show Me Where
It’s on the console table under the photo.
Step 6
Place all the wooden pieces onto the box in the main room and collect the fuse.
Step 1
Take a photo of the card attached to the photo in the corridor.
Step 2
Dial the number on the card to hear the talking clock.
Show Me The Solution
The required phone number is 100.
Step 1
Take a photo of the poster on the wall of the room past the fans.
Step 2
Tap on the tiles on the box that match the ones in the poster.
Show Me The Solution
The bottom right of the poster is the bottom right of the box.

Step 1
Collect the vinyl record.
Show Me Where
It’s locked up in the globe.
Step 2
Place the record onto the player in the bedroom.

Step 1
Take a photo of the chalkboard in the war room.
Step 2
Work out which word from the board that can be spelt via the globe lock.
Show Me The Solution
The only word on the board that works is ‘key’. Don’t hate us.
Step 3
Unlock the globe and collect the record.

Step 1
Take the key from the lock by Clara’s room and insert it into the unbranded modelling compound on the coffee table in the main room, then take it back out again.
Step 2
Pick up the empty mug.
Show Me Where
It’s on the coffee table in the main room.
Step 3
Fix the plumbing under the taps to turn the water back on.
Step 4
Turn the tap on and fill the empty mug with water.
Step 5
Pour the water from the mug into the tub of plaster of paris to collect some wet plaster.
Step 6
Put the wet plaster into the hole in the modelling compound to mould a new key. Trust us, that’s how keys work.
Step 7
Collect the newly created key from the compound.
Step 8
Insert both the original and new keys into the lock by Clara’s room.
Step 9
Turn the keys to unlock the door.
Step 1
Take a photo of the error number displayed on the broken record player.
Step 2
With the TV bars correctly aligned, take a photo of the displayed time.
Step 3
Listen to the talking clock when you’ve dialed the correct number, and work out the time.
Step 4
Unlock the computer in the main room and take a photo of the time displayed.
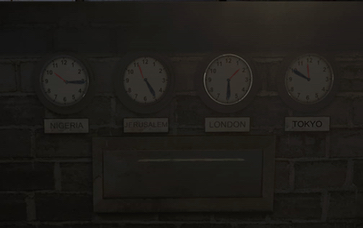
Step 5
Enter all the times into the clocks to unlock the hatch and collect the fuse.
Show Me The Solution
The correct times are:
Nigeria – 5:55
Ottawa – 6:45
London – 2:55
Tokyo – 2:20

Step 1
Collect the first fuse.
Show Me Where
It’s in the metal box on the shelf in the room beyond the fans.
Step 2
Collect the second fuse.
Show Me Where
It’s in the box on the floor of the bedroom.
Step 3
Collect the third fuse.
Show Me Where
It’s on the table in Clara’s room.
Step 4
Collect the fourth fuse.
Show Me Where
It’s in the hatch in the war room.
Step 5
Collect the fifth fuse.
Show Me Where
It’s in the wooden box on the coffee table in the main room.
Step 6
Place all the fuses into the fuse box by the main door and then arrange them so their printed numbers add up to the number above their sections.
Show Me The Solution
The required order is 5, 4, 1, 11, 3, 6, 7, 2.
Hotel

Step 1
Watch the loading animation on the TV and use that to unlock the drawer.
Show Me The Solution
The required button order is 2, 5, 4, 1, 3.
Step 1
Unlock the drawer in the bedside cabinet.
Step 2
Take a photo of the paper in the drawer.
Step 3
Set the rectagular bedside clock to the time specified in the bible verses.
Show Me The Solution
The required time is 16:33.
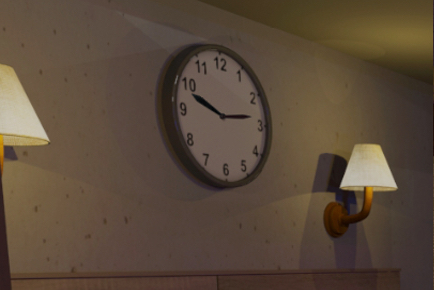
Step 4
Set the circular wall clock to the time specified in the bible verses.
Show Me The Solution
The required time is 7:15.
Step 5
Collect the key from the wall clock.

Step 1
Take a photo of the stained glass in the bedside drawer.
Step 2
Use the descending order of the shapes in the stained glass to work out the order of the safe buttons to press.
Show Me The Solution
The order is square, triangle, moon, circle, star.

Step 1
Unlock the safe in the wardrobe.
Step 2
Take a photo of the bank card in the safe.
Step 3
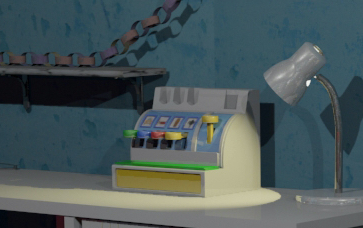
Enter the card details into the payment screen on the TV.
Show Me The Solution
The required details are 8882.

Step 1
Unlock the TV menu using the card details.
Step 2
Take a photo of the movie selection screen.
Step 3
Rearrange the paintings on the wall to match the order of the movies on the TV.
Show Me The Solution
Going left to right, top to bottom, the required order is Another Tomorrow, All That Remains, Veritas, Cabin Escape, A Short Tale, The Forgotten Room.
Step 4
Collect the door key.

Step 1
Take a photo of the writing in the bathroom sink.
Step 2
Using the letters and numbers in the sink, unlock the fridge under the TV.
Show Me The Solution
The required code is 3 X 5 1 1 Y.

Step 1
Take a photo of the writing on the bathroom wall.
Step 2
Take a photo of the magnets on the fridge door.
Step 3
Combine these two clues to work out what the code for the globe is.
Show Me The Solution
The required code is M I C.

Step 1
Collect the pencil from the wardrobe.
Step 2
Wedge the pencil in the latch for the right hand vent to keep it open.

Step 1
Open the right hand vent in the bathroom.
Step 2
Open the left hand vent in the bathroom.
Step 3
Take a photo of the flies now visible by the vents in the bedroom.
Step 4
Use the number of flies to open the lock on the briefcase.
Show Me The Solution
The required code is 2, 3, 4, 1, 5, 2, 6, 1.

Step 1
Press the button on the speaker box on the bed then replicate the notes on the guitar.
Show Me The Solution
From top to bottom the order is 1, 4, 2, 3.
Step 2
Collect the key from the speaker box.
Step 1
View the room service menu by the TV and take a photo of it.
Step 2
Collect the orange from the bowl near the TV.
Step 3
Collect the mug from near the TV.
Step 4
Collect the vodka from the globe.
Step 5
Collect the water from the briefcase.
Step 6
Collect the egg box from the bin under the TV.
Step 7
Unlock the fridge.
Step 8
Combine the water with the egg box.
Step 9
Place the egg box with water in it in the ice box, close the door, then open it up and collect the ice cubes.
Step 10
Juice the orange on the juicer in the wardrobe.
Step 11
Use the mug to collect the orange juice and combine it with the ice cubes and vodka to make a Screwdriver cocktail.
Step 12
Pour the cocktail down the bath plughole.
Step 13
Collect the key from the bath.
Step 1
Collect the first door key.
Show Me Where
It’s under the bath plug.
Step 2
Collect the second door key.
Show Me Where
It’s locked in the wall clock.
Step 3
Collect the third door key.
Show Me Where
It’s locked away in the wall paintings.
Step 4
Collect the fourth door key.
Show Me Where
It’s in the speaker box on the bed.
Step 5
Use all 4 keys to unlock the door and escape.
Pirate Ship

Step 1
Collect the sword from above the door.
Step 2
Use the sword to open the crate.
Step 3
Collect the key from inside the crate.
Step 4
Use the key to unlock the door.
Step 1
Take a photo of the scroll on the captain’s table.
Step 2
Rotate the discs on the barrel to match the scroll.
Show Me The Solution
Step 3
Collect the feathers from the barrel.

Step 1
Collect the screwdriver.
Show Me Where
It’s on a barrel in the captain’s quarters.
Step 2
Use the screwdriver to collect the pirate leg from the captain’s quarters.
Step 3
Use the screwdriver to collect the pirate arm from the captain’s quarters.
Step 4
Combine the pirate leg and arm to form a makeshift hook.
Step 5
Place the hook inside the bottle with the ship in it.
Step 6
Pull the hook to raise the sails and view the clue.

Step 1
Collect the broom.
Show Me Where
It’s near the pipes.
Step 2
Collect the empty sack.
Show Me Where
It’s up the ladder.
Step 3
Collect the feathers.
Show Me Where
They’re in the barrel.
Step 4
Fill the sack with the feathers.
Step 5
Place the sack down on the floor under the pots on the shelf, near the rope.
Step 6
Knock a pot off the shelf with the broom.
Step 7
Collect the pot from the sack.
Step 8
Remove the cork from the pipes and fill the pot with water.
Step 9
Place the full pot on the hatch and watch as it opens, as it’s now ‘under water’.

Step 1
Take a photo of the sign above the bottled ship.
Step 2
Use that clue to open the compass box.
Show Me The Solution
The solution is S E N S E S.
Step 3
Collect the ball from inside the box.

Step 1
Solve the ship in the bottle to raise the sails.
Step 2
Take a photo of the raised sails.
Step 3
Collect the broken spyglass.
Show Me Where
It’s in the locked chest below deck.
Step 4
Collect the lens.
Show Me Where
It’s either on the captain’s table or in the porthole you put it in.
Step 5
Combine the lens and broken spyglass to fix it.
I Think Something’s Wrong
If you can’t find the lens you’ve probably left it on the porthole in the first room.
Step 6
Look through the porthole at the distant ship using the spyglass and take a photo of the sails.
Step 7
Use the two sails clues to enter the correct digits into the box.
Show Me The Solution
Going left to right, top to bottom, the required code is 3, 1, 2, 1, 5, 2.

Step 1
Collect the screwdriver.
Show Me Where
It’s on a barrel in the captain’s quarters.
Step 3
Use the screwdriver to collect the pirate leg from the captain’s quarters.
Step 3
Use the screwdriver to collect the pirate arm from the captain’s quarters.
Step 1
Collect the porcelain ball.
Show Me Where
It’s in the compass box on the captain’s table.
Step 2
Collect the lens.
Show Me Where
It’s on the captain’s table.
Step 3
Collect the metal tray.
Show Me Where
It’s on the captain’s table.
Step 4
Place the porcelain on the strange pedestal in the first room.
Step 5
Place the tray on the rack above the first door where the sword was held.
Step 6
Place the lens on the porthole with moonlight shining through in the first room.
Step 7
View the strange pedestal in the first room and note the shapes on the ball. Use these to open the chest below deck.
Show Me The Solution
Going left to right, top to bottom, the required code is diamond, star, pentagon, circle, triangle, circle.

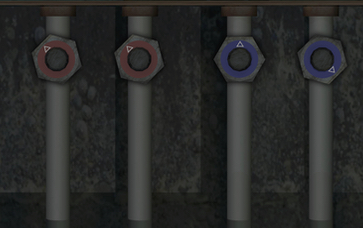
Step 1
Collect the first hatch key.
Show Me Where
It’s below deck.
Step 2
Collect the second hatch key.
Show Me Where
It’s inside the locked chest below deck.
Step 3
Collect the third hatch key.
Show Me Where
It’s in the locked box in the captain’s armoire.
Step 4
Collect the fourth hatch key.
Show Me Where
The little pirate doll is holding it in the captain’s armoire.
Step 5
Place all 4 keys in the hatch locks and open it.
Train Station

Step 1
Take a photo of the book by the door.
Step 2
Take a photo of the paint on the wall.
Step 3
Use these two clues to rotate the dial on the box to the required colours and press the button each time to enter the selection.
Show Me The Solution
The correct order is Green, Blue, Green, Blue, Orange.
Step 4
Collect the can of oil.
Step 1
Collect the can of oil from the wall.
Step 2
Collect the wrench from the floor.
Step 3
Use the oil on the cart.
Step 4
Push the cart towards the door.
Step 5
Climb the cart and use the wrench to open the vent.

Step 1
Take a photo of the ripped paper on the floor of the train.
Step 2
Use this photo to select the required images on the staff room door that spell out the message.
Show Me The Solution
The correct order is the letter O, the pen, the staff, the letter Z and the number 1.
Step 1
View the slider on the floor near the base of the escalator and slide it to line up with 1, 2, and 3. Noting down the white circles.
Step 2
Turn the required lights on to match the slider.
Show Me The Solution
Step 3
Turn the required lights on to match the slider.
Show Me The Solution

Step 4
Turn the required lights on to match the slider.
Show Me The Solution

Step 5
Collect the phone charger.

Step 1
Collect the kettle from the staff room.
Step 2
Fill the kettle with water from the barrel in the tunnel.
Step 3
Boil the kettle in the staff room and pick it up.
Step 4
Pour the boiling water on the wall near the security booth door.
Step 5
Use the shapes revealed in the paint to open the rear door of the train.
Show Me The Solution
The correct order is red ( L ), green ( — ), blue ( T ), yellow ( — ), red ( L ).
Step 6
Collect the loose change from on top of the barrel.

Step 1
Collect the severed finger from the staff room freezer.
Step 2
Use the finger on the scanner by the security booth door.

Step 1
Collect the torch from the security booth.
Step 2
Collect the phone from the security booth.
Step 3
Collect the phone charger from the staff room locker.
Step 4
Remove the grate from the drain in the staff room.
Step 5
Collect the litter picker from the base of the escalator.
Step 6
Use the torch to see down the staff drain and use the litter picker to collect the wallet.
Step 7
Take a photo of the pin number on the security booth pinboard.
Step 8
Insert the bank card from the wallet into the ticket machine by the turnstile.
Step 9
Enter the pin into the keypad of the ticket machine.
Show Me The Solution
The correct pin is 2297.
Step 10
Insert the phone charger into the plug in the staff room.
Step 11
Plug the phone into the charger.
Step 12
Take a photo of the ticket reference on the phone.
Step 13
Enter the reference code into the ticket machine.
Show Me The Solution
The correct code is CJD90667421.
Step 14
Collect the recently printed ticket.
Step 12
Insert the ticket into the turnstile to open the gate.
Step 1
Collect the first set of loose change.
Show Me Where
It’s at the back of the train.
Step 2
Collect the second set of loose change.
Show Me Where
It’s near the kettle in the staff room.
Step 3
Collect the third set of loose change.
Show Me Where
It’s in the wallet down the drain in the staff room.
Step 4
Insert all 3 sets of loose change into the vending machine to drop the laces and collect them.
Step 5
Take a photo of the line map at the base of the escalator.
Step 6
Place the shoelaces on the power lever at the front of the train.
Step 7
Rewire the powerbox at the end of the bridge after the turnstile using the line map.
Show Me The Solution
The required sequence is A -> H, B -> G, C -> F, D -> J, E -> I.
Step 8
Press the power button to move the train and create your new exit.